Your Keurig leaking water is never what you want to see first thing in the morning.
It can totally derail your day.
Why do leaks happen? Are they fixable?
I’ll answer all those questions in this article.
I’ll explain the most likely causes and tell you how to go about fixing them.
Let’s get to it!
Why is My Keurig Leaking Water From the Top?
Your Keurig leaking water from the top is a really bad thing. No sugar coating that.
But that’s the bad news.
What’s the good news?
Well, most of the time, the issue is pretty easy to fix.
Let’s start with the simplest and most likely causes and work our way from there.
Your Keurig Might Be Clogged
If your Keurig coffee maker is leaking water from the top, there could be a clog somewhere in the tubing.
A good way to go about unclogging your machine is to give it a thorough cleaning.
Here’s a step-by-step guide to unclogging your Keurig:
- Remove all the detachable components. This includes the drip tray, water reservoir, and even the capsule holder.
- Wash all the detachable components. Make sure you get all the gunk and grime off. While it isn’t likely that the clog is in the water reservoir, any sediment in the water tank might contribute to the clog. Getting rid of any sediment is a good way to keep your Keurig clog-free.
- Run a descaling cycle. This is the best way to remove a clog in your machine. This will clear the tubes and any debris that is blocking the water. It’s best to run a descaling cycle about once a month or so, even if your Keurig is running fine.
- Run 2-3 rinse cycles. All this means is to press “Brew” a few times without a K cup pod in the coffee maker to let hot water run through.
If your machine is leaking water because of a clog, using these steps will help solve the problem.
If this doesn’t work, don’t worry! There are still other ways to fix the issue.
You Might Be Overfilling The Water Tank
Overfilling your Keurig can be really easy.
I’ve done it plenty of times.
Make sure you only add water up to the max fill line of your water tank. If you take care not to overfill your reservoir, then your Keurig should stop leaking.
You should also check that your water tank is aligned correctly on the coffee maker. If it isn’t, your Keurig might put too much water into the system during your brew.
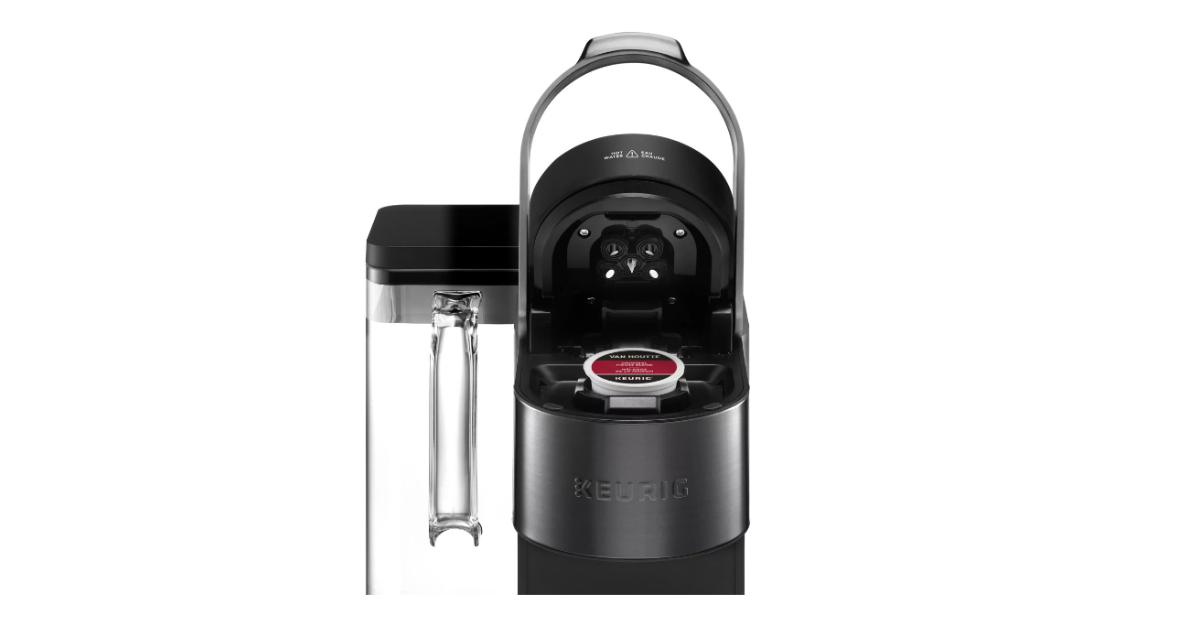
You Might Have Faulty Capsules
Another thing that might cause your Keurig to leak water is the K-Cup itself.
I know it sounds odd, but it’s totally possible.
The most common reasons for faulty K-Cups are:
- Too much air in the K-Cup. If your K-Cup looks like it’s ready to burst, then it might explode and cause the water that was supposed to go into the pod to leak.
- Incorrect seal. If the K-Cup isn’t sealed correctly, then the entrance needle won’t be able to get through, and water will start to leak.
- You’re brewing at a high altitude. Ok, hear me out. K-Cups get pressurized at higher elevations, the same way a bag of chips does. The pressure inside your K-Cup from the altitude might cause it to explode when the needle goes through. A way around this is to poke a small hole with a sewing needle before putting the pod in the coffee maker.
Try using a few different K-Cups, brands, and drinks to see if it’s only a specific K-Cup that is faulty or if the issue is somewhere else in the machine.
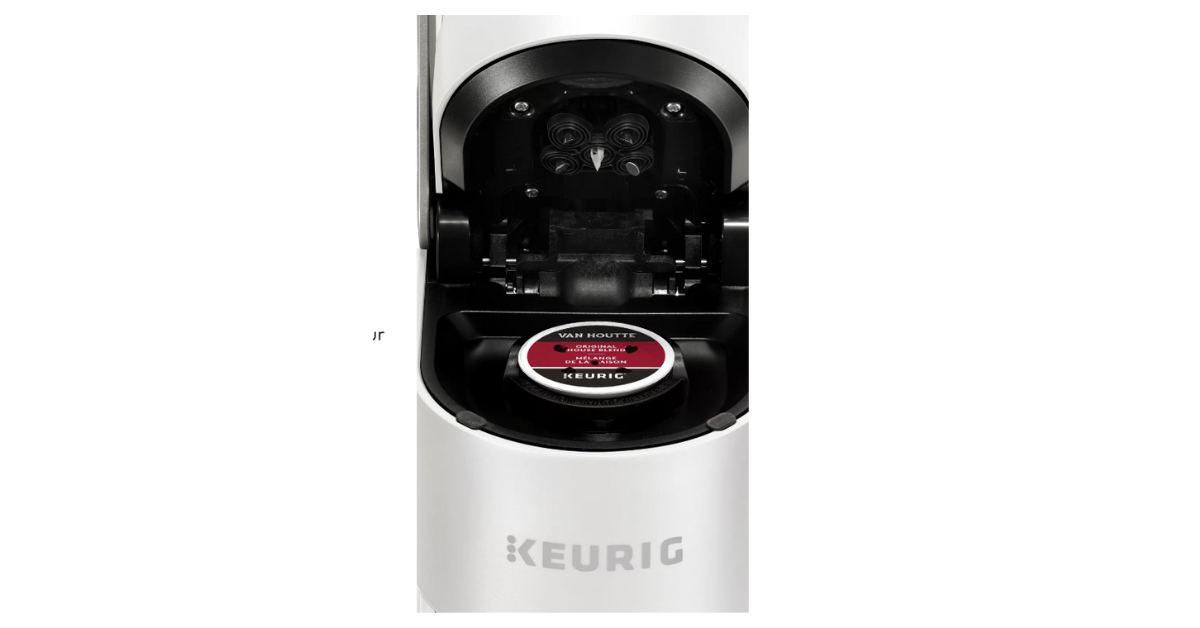
The Entrance Needle Might Be Dirty
The entrance needle is the part of the machine that punctures the K Cup coffee pod when you close the lid.
It also is what gets fresh water through the Keurig K Cup and into your mug. So, if the needle is dirty or clogged, then water can’t get through to your coffee.
How easy is it to fix?
Very!
Here’s how to clean the entrance needle:
- Get a paper clip. It doesn’t have to be a paperclip, it could be a sewing needle or something similar. But you’ll need it to unclog the entrance needle.
- Remove the pod holder. This is where you put the pods. It comes out and should separate into two sections.
- Clean the pod holder. Push the paperclip through the funnel at the bottom of the pod holder. Give both sections a good rinse and make sure they are clean.
- Clean out the entrance needle. With the paperclip, clean out the silver entrance needle underneath the lid of your Keurig. Double check you got it completely clean.
- Reassemble the pod holder and machine. Once everything is clean, you can put your machine back together.
The Upper Gasket Might Be Loose Or Broken
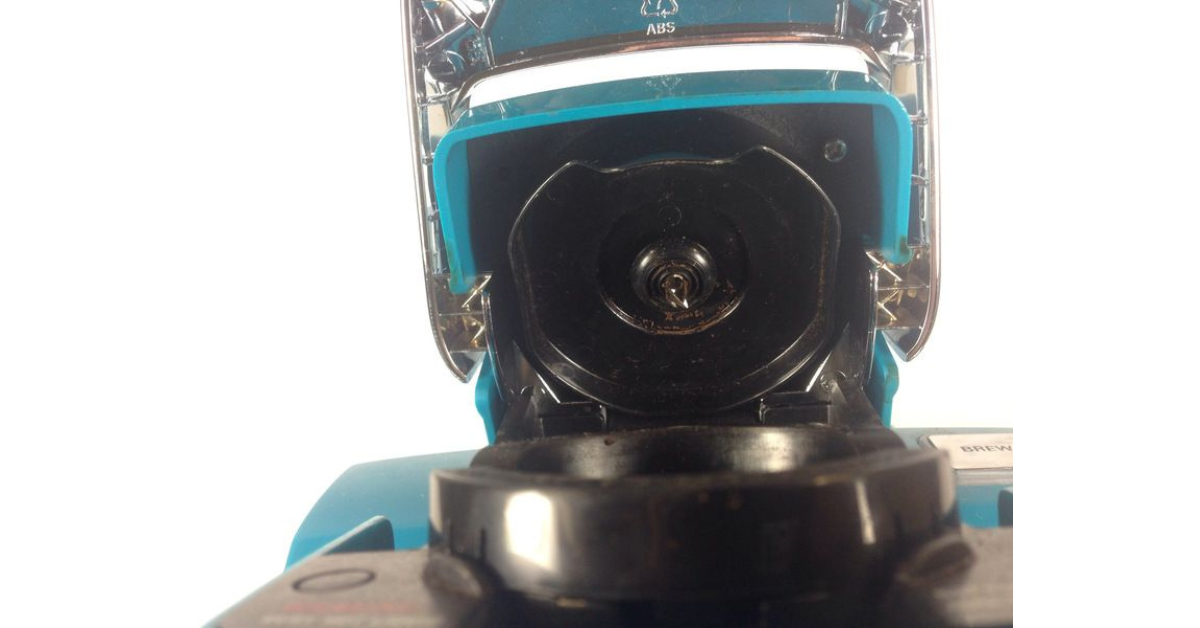
While you’re up there cleaning the entrance needle, it would also be a good idea to check the upper gasket.
That’s the silicone piece that goes around the base of the entrance needle. When it’s working right, it forms a tight seal between the entrance needle and the K-Cup.
If the upper gasket is loose or broken, then water can leak.
The good news is that it’s really easy to tell if it’s broken or loose.
- Open the lid of the machine. You’ll find the entrance needle under the lid.
- Find the upper gasket. It sits around the entrance needle up against the lid.
- Check if it’s loose or broken. You can even take it all the way out by pulling around the edges. Don’t worry, it’s meant to be easily replaceable.
- If it’s not broken, replace it and make sure it’s seated correctly. It should snap back into place. Check all the edges to make sure it is secure.
- If it is broken, order a replacement. Keurig sells replacement upper gaskets, so you’ll need to buy a replacement to fix the issue.
Why is My Keurig Leaking Water From the Bottom?
Unfortunately, the top of your Keurig coffee maker isn’t the only place where leaks can happen.
Water leaks can also happen at the bottom of your Keurig coffee maker.
While this may sound serious, there are really only three reasons your machine might be leaking from the bottom. And they are all relatively easy to check and fix.
If you try all these methods and don’t see results, then you might be able to get a warranty replacement from Keurig.
The O-Ring Might Be Bad
The O-Ring is a little silicone ring that creates a seal at the bottom of the water tank. You can find it where the water tank connects to the hose.
Here’s how to check and fix the O-Ring:
- Check the O-Ring is still there. It might have fallen off or been lost. If it’s not there, water will almost certainly leak from the bottom. You can get a new O-Ring from Keurig, but make sure you know which model machine you have. The O-Rings are slightly different between models.
- Check the position of the O-Ring. It should sit snug against the bottom of the water tank. If it has moved from where it should be, you can use your fingers to push it back into place.
- Check for any cracks in the O-Ring. If pushing the O-Ring back into place doesn’t fix the issue, you can check for any cracks or damage by taking it off and inspecting it. If there is damage, you’ll need to get a replacement.
If the O-Ring is in good condition and in the correct spot, then the issue might be in the water tank.
Cracked water tank
Another reason your Keurig coffee maker might be leaking from the bottom is the water tank itself.
It could be cracked.
- Remove and inspect the water tank. Is there a giant crack down the side? Is there a crack at the bottom? If there’s a crack, you’ll need to order a new water tank.
- Check for water at the bottom of the well. When you lift up the water tank, is there water underneath? That’s a possible sign the water tank is damaged and needs to be replaced.
- Hold the water tank over a sink. If water drips into the sink, that’s another sign the water tank is damaged and should be replaced.
If the water tank is damaged or cracked, you can order a replacement water tank from Keurig.
You’ll need to know which model machine you have because the water tanks are different between models.
The Water Tank Seal Might Be Faulty Or Dirty
When you put the water tank onto the machine, there is a valve that connects to the intake hose.
If there is significant limescale buildup, the connection won’t be solid and needs to be cleaned.
The good news is that you can run a descaling cycle in your machine to help clean it out.
That should be enough to fix the seal.
For a deeper clean, you can take some white vinegar and wipe down both the valve and the connection on the coffee machine.
Doing both is probably a good idea to make sure the whole connection gets clean.
FAQ
Let’s answer a few general questions about Keurig’s lifespan and maintenance.
Remember: regular maintenance is necessary to keep your Keurig coffee machine running smoothly for a long time.
How long does a Keurig last?
Generally, customers say that Keurig’s will last 3-5 years. You can make sure you get a full lifespan of your Keurig with regular cleaning and descaling cycles.
When should I replace Keurig?
If your coffee machine is slowing down, taking longer to brew coffee, or your coffee is watered down, it might be time to replace it.
However, I would suggest giving your machine a deep clean, descaling, and trying the maintenance referenced in this article.
How do I deep clean my Keurig?
Deep cleaning a Keurig brewer is understood as hand washing and scrubbing all the detachable parts (drip tray, water reservoir, pod holder).
Then, you should descale your Keurig with a descaling solution and run a water-only brew cycle to deep clean the inner workings.
Final Thoughts
This article should be all you need to check, diagnose, and fix most problems that lead to leaking Keurigs.
Start with a deep clean of your Keurig machine to see if that fixes the leaks. Then check the water tank, entrance needle, gaskets, and valves.
The problem should be pretty easy to find.
If you’re having trouble, you can always contact Keurig customer service. They’ll walk you through everything and help get replacement parts if necessary.
Good luck!
Looking for a new Keurig? Check out our article on the best Keurig models!