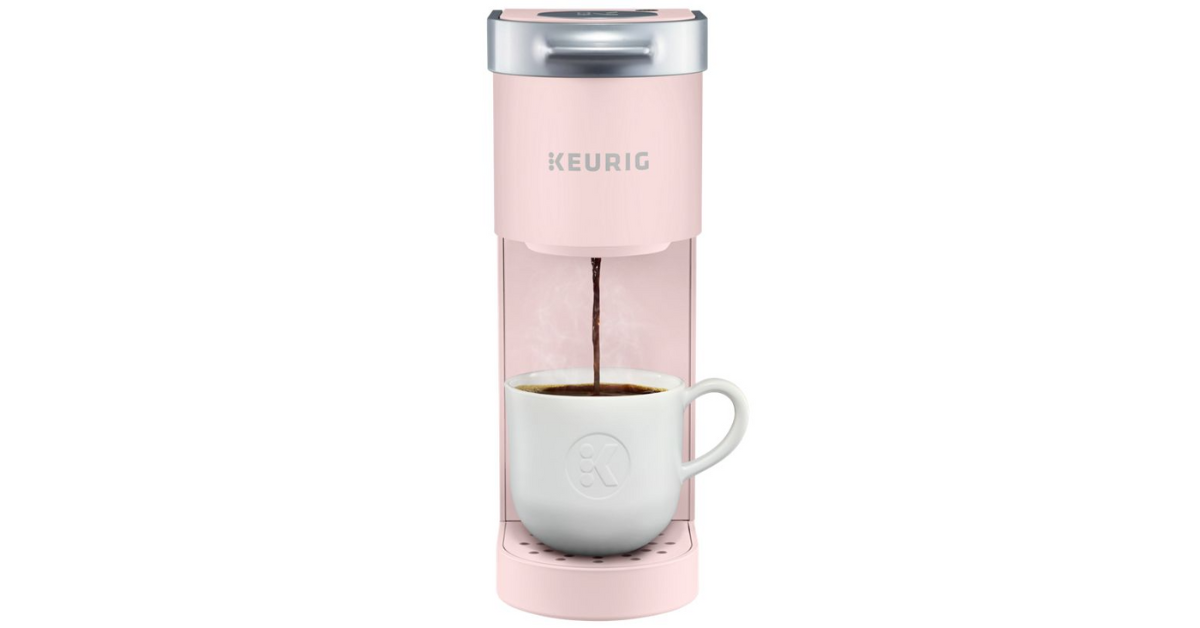
You just got a Keurig K-Mini. Congrats!
But now you’re faced with brewing your first cup.
Maybe you’re not sure where to start.
Don’t worry! I’m here to help. I’ve used enough Keurig Mini machines in my day to know the ins and outs of how to use them.
In this article, I’ll give you everything you need to know on how to use Keurig Mini.
Let’s get to it!
Setting up a Keurig Mini
Okay, first off, you’ll obviously need a Keurig K Mini coffee maker.
When you’re ready, take your K-Mini out of the box and find a good place in your kitchen for it to go. Keep in mind it will have to be near a power outlet.
At the back of your machine, you’ll find the cord storage. Take out the cord and plug it in!
You’ll find the power button on the top right.
Setting up the Water Tank
You’re so close to starting your brew.
But the water tank is important (because you need water to make coffee, after all).
QUICK NOTE
There are two versions of this machine, the K-Mini, and the K-Mini Plus. The K-Mini coffee maker does not have a removable water tank, while the K-Mini Plus does.
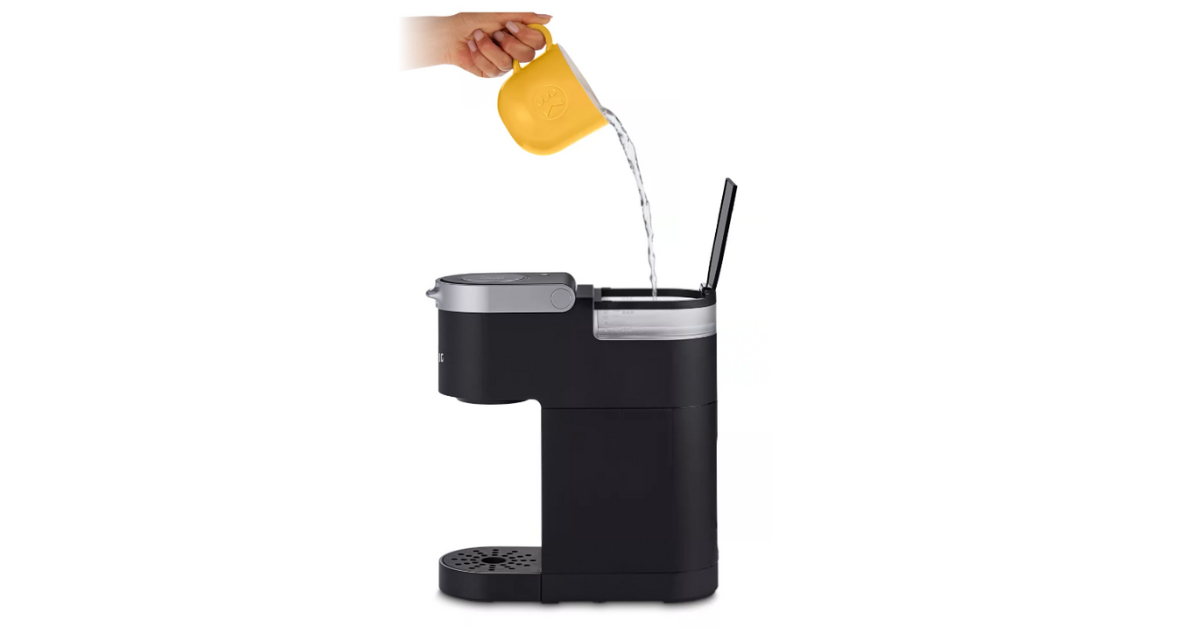
The best way to know how much water to use in your K-Mini brewer is to simply fill the mug you want to use with water.
Then you can pour the water into the water tank. The water tank will be at the back of the machine.
Be careful not to use more than 10 oz of water, though!
REMEMBER
Don’t use distilled water in your K-Mini coffee maker. Only use tap, bottled, or filtered water. Distilled water doesn’t have any minerals, which means that it will attract metals from your machine. That will cause damage over many uses.
Only use water. Using milk or something else besides water will cause permanent, catastrophic damage to your machine.
Cleansing Brew
Before brewing that first cup of coffee, you’ll need to run a cleansing brew.
This is as simple as it sounds, and it’s a good way to practice using your Keurig coffee machine before brewing coffee.
Here’s how to run a cleansing brew:
- Fill your machine with 10 oz of water.
- Then power up your K-Mini brewer by pressing the power button on the top of the machine.
- Once your machine is ready, lift and close the latch without putting in a pod.
- Then press the brew button.
That’s it!
A cleansing brew is important to clean the machine from any factory dust or other particles before your first cup.
Running a cleansing brew is recommended by Keurig every month or so.
Choosing A K-Cup
This is where things get really fun.
There are hundreds of K Cups out there. But if you are just getting into Keurig machines, it might be best to try some of Keurig’s own coffee.
Green Mountain (which is part of the Keurig company) has a ton of good coffees and flavors.
Starbucks also sells a ton of different K Cups. Chances are you’ll be able to find your favorite coffee in a K Cup pod.
But if not, don’t worry! You can actually get a reusable K Cup that you can fill with any coffee you want.
If you want something other than coffee, you can find pods for those. There are teas, hot chocolates, and even iced coffee pods available.
REMINDER
Don’t remove the foil from the top of the pod when you start to brew. There are needles in your Keurig machine that pierce the foil. Remove the foil, and you will end up with a leaky, clogged machine and a terrible cup of coffee.
How to Use Keurig Mini
Let’s recap really quick:
Right now, you’ve unboxed and plugged in your K-Mini coffee maker.
Then, you ran a cleansing brew to clean out all the factory gunk left over from production.
Finally, you picked out a great K Cup, and you’re ready to brew.
So, here’s a guide to help you brew a great cup of coffee:
- Fill your mug with water (remember, not distilled!) and pour the water into the water tank at the back of your coffee maker.
- Place the mug on the drip tray underneath the coffee spout at the front.
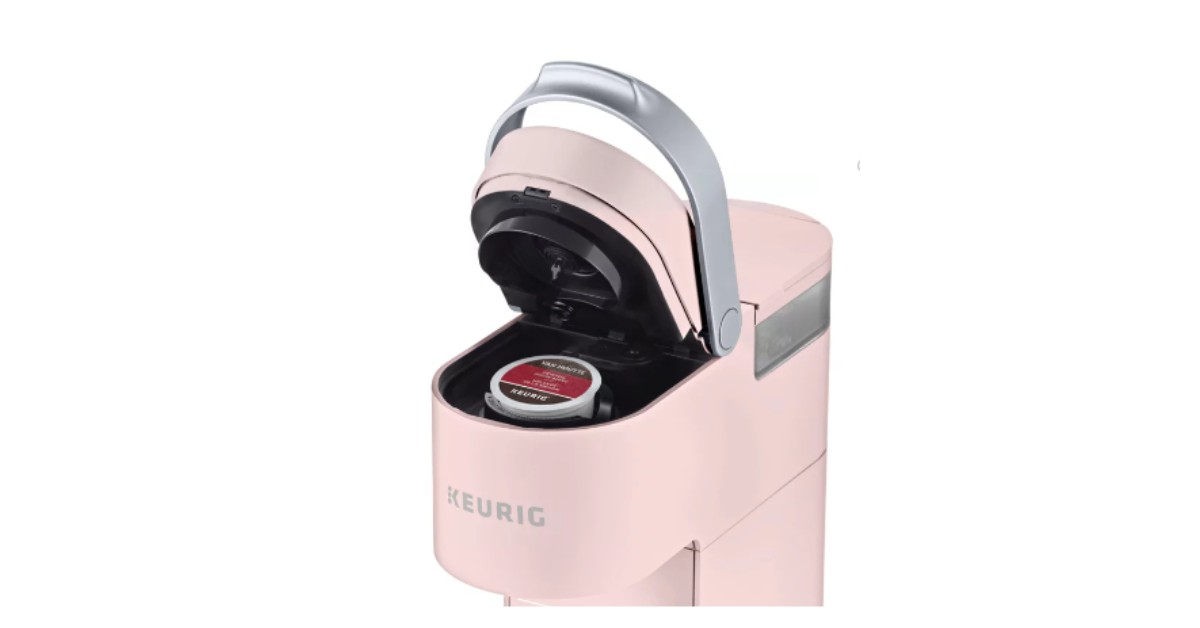
- Lif the handle to open the pod container.
- Insert your chosen pod.
- Close the latch firmly and make sure it snaps into place.
- Press the power button on top of the machine. The light will start to pulse and the machine will start to warm up.
- When the light turns solid (after 2 minutes or so), your coffee will start to brew.
- The light will turn off when the machine is done brewing.
- Lift the handle to open the pod container.
- Remove the used pod and discard it (usually, you can recycle the pods!).
- Keep the lid open to let the container dry out.
- Your machine will turn off automatically 90 seconds after it is finished brewing.
NOTE ON THE K-MINI PLUS
The K-Mini Plus has a “Strong” button. You can push this at the beginning of the brew to produce a stronger and bolder cup of coffee.
Cleaning and Descaling Your Keurig Mini
Cleaning your K-Mini brewer is a pretty simple process.
Start by turning off your machine.
Then you can remove and wash the drip tray. If you have the K-Mini Plus, you can remove and clean the water tank as well.
Wipe down the outside of your brewer with a damp cloth.
Remember the cleansing brew from earlier in the article? Well, to give the insides of your machine a good clean, run 2-3 of those cleansing cycles.
That will get all the stale coffee tastes out of your next brew.
What about descaling? What is descaling?
Descaling is a process that removes hardened minerals in your machine. It’s essential for keeping your Keurig coffee maker going and giving it a long lifespan.
You should descale your brewer every 3-6 months.
You’ll need a descaling solution. There are plenty of options out there, but I always recommend Keurig’s own descaling solution.
Instead of only using water for a cleansing cycle, use one part water and one part descaling solution.
Then run a brew cycle without a pod. And repeat the brew cycle 2-3 more times to make sure there isn’t any descaling solution left over.
NOTE
It’s always best to refer to your owner’s manual when running special functions in a coffee machine.
How to Keep Your Keurig Mini Between Uses

Between uses, it’s best to turn off and unplug your K-Mini. You can replace the cord in the cord storage at the back of the machine.
Always empty the water tank between uses.
And make sure you keep your machine in a frost-free environment.
Keurig Mini Troubleshooting
If you’re having trouble with your K-Mini brewer, chances are it’s a simple fix.
The most common problems I’ve encountered:
- The machine is not plugged in (I know it sounds silly, but I’ve been there too many times to not say anything)
- The latch isn’t closed all the way. Double check that the pod and latch are in the right spot
- Water level. Either there isn’t enough water, or there is too much. Check you have the right amount of water in your machine
This isn’t an exhaustive list by any means, but it should be a good starting point.
Related Reading: Keurig Troubleshooting: How To Fix 10 Common Problems
Final Thoughts
You are now equipped to brew with your Keurig K-Mini brewer!
I know that Keurig’s can be a little confusing when you first start brewing with them.
But remember that these machines are designed for convenience and easy use.
I firmly believe you can brew an excellent cup of coffee following these steps.
Happy brewing!
Want to use your own coffee instead of K-Cups? Check out our article on how to use ground coffee in a Keurig!