Want to make iced coffee with AeroPress? Jump into our guide and check out the ultimate recipe for a refreshing AeroPress iced coffee drink.
Even though it might not seem like it at first glance, AeroPress is quite a versatile coffee maker.
Aside from your regular brew, you can make other coffee drinks as well.
Iced coffee with AeroPress?
Yes, it’s possible!
And quite easy as well.
I nailed it on the first try, and surely you’ll too.
In this article, I’ll share with you step-by-step instructions on how to make this delicious drink by yourself.
Let’s dive in.
How to Make Iced Coffee with AeroPress?
The great thing about AeroPress is that it makes a delicious, well-rounded, and very aromatic cup of java.
And that sounds just right for making iced coffee. You want the coffee to be concentrated, so it doesn’t get too diluted by ice and turn into a watery cup of joe.
Now, let’s discuss the details of the iced AeroPress recipe.
The ingredients you’ll need
To make AeroPress iced coffee, you only need three things:
- Coffee (0.6 ounces)
- Ice (3 ounces)
- Water (4.8 ounces)
With AeroPress, there’s no standard ratio recommended by the brand. After all, it depends on how rich and concentrated you want your coffee to be.
Most coffee drinkers use a ratio between 1:18 and 1:11 coffee-to-water.
Oh, but don’t forget the fact that you’re also adding ice to your cup. And given that ice will melt and blend in your drink, it should be considered as “water.”
Today, we’ll be using a ratio of 1:4.8:7.6 coffee-to-ice-to-water.
I’ve already done the math – which you can see above in the ingredient list. I feel like this ratio gives you a good starting point. Of course, you can always tweak the recipe depending on how concentrated you like your coffee.
You should keep in mind that the water we’ll be using for brewing should be preheated.
Now, you probably know that the Golden Standard for brewing coffee is water temperature between 195ºF and 205ºF.
However, the paper guide you get with the AeroPress recommends temperatures ranging between 175ºF and 185ºF, depending on the roast. The darker the roast, the lower the temperature required for extraction.
Finally, let’s talk about what coffee to use. There are three factors to consider:
- Grind size
- Roast level
- Bean origin
AeroPress uses a medium-fine grind size, which is between drip and espresso. The coffee particles are around the same size as table salt or seasoning rub.
As for the roast level, it depends on your preference. If you prefer a complex and slightly acidic cup of coffee with floral and fruity undertones, go with a light roast.
For a bolder flavor and heavier body, choose dark-roasted coffee.
And for something in between, you have a medium roast.
When it comes to bean origin, that also depends on the flavor profile you’re looking for.
So, for instance:
- Central America – complex and crisp, can be spicy
- South America – sweet and buttery smooth
- Africa – bright, fruity, or floral
- Asia – earthy, woody, and smoky
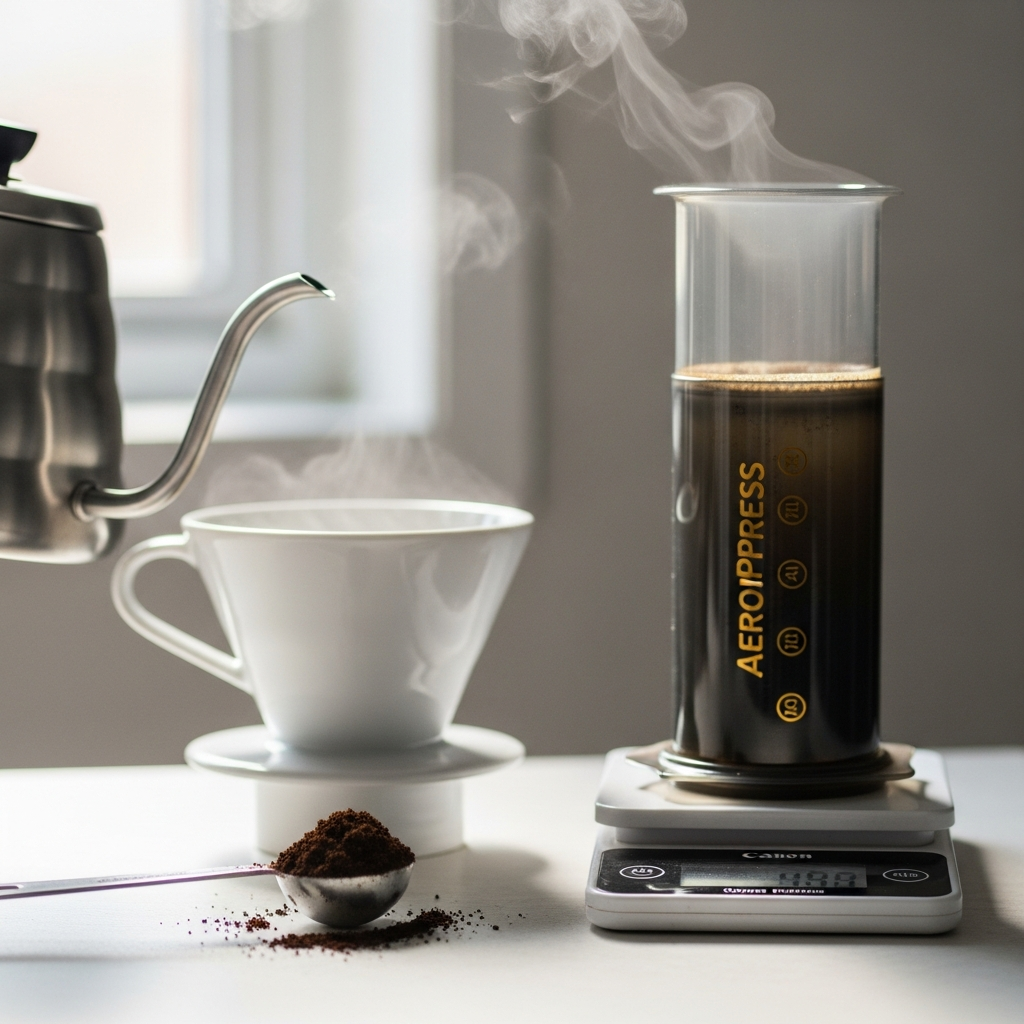
The necessary equipment
As for the things you’ll need, those are:
- AeroPress (duh)
- Grinder (unless you’re using pre-ground coffee)
- Coffee scale
If possible, it’s always best to grind your own beans. Freshly ground coffee bean makes a really flavorful cup of java. But if you don’t own a grinder, that’s ok. Just make sure the grounds you’re using aren’t stale.
As for the coffee scale – it’s not 100% necessary, but I strongly recommend using it. As you can see, we’re talking about small amounts of coffee, ice, and water, so you want to get the ratios right.
Step-by-step instructions
Alright, now that you have everything at hand, it’s time to make iced AeroPress coffee!
For this specific recipe, I suggest using the inverted AeroPress method.
What this means is you’re starting brewing with the AeroPress upside down, then turning and pressing the plunger.
With the regular method, coffee starts dripping into the cup right away. This can cause it to turn weak and even under-extracted.
By using an inverted method, you can let the grounds steep for a while and extract better before pressing the plunger.
Don’t worry. The process is rather simple. Here’s what you need to do:
- Using the coffee scale, weigh 3 ounces of ice and pour it into a cup you’ll brew coffee into.
- Put the plunger in the brewing chamber, then flip the AeroPress upside down.
- Place AeroPress on the coffee scale with the chamber side up.
- Tare the scale before adding 0.6 ounces of coffee into the AeroPress. Very slightly, tap the AeroPress to flatten the coffee bed for better extraction.
- Boil 4.8 ounces of water using the kettle, then let it settle for 30-60 seconds to cool down a bit.
- Pour water into the AeroPress just enough to saturate the grounds. Let the coffee bloom for 30 seconds before adding the rest of the water.
- Using a spoon, stir the coffee grounds for about 30 seconds.
- Wet the paper filter with a bit of hot water, then place it into the cap. After that, attach it to the brew chamber.
- Quickly flip the assembly over the cup so that you don’t spill coffee. Press the plunger and pour coffee over the ice.
I know, nine steps do sound like a lot. But trust me, it’s super simple and quick, and you’ll get it on the first try.
Brewing coffee like a pro
To make your brew even better, I’ll share with you a few tips and tricks I’ve learned from many trials and errors.
The first thing would be to press gently. You don’t want to push too hard or too fast on the plunger, as that can cause the coffee grounds to get compacted.
Now, you may feel like you must press too hard as AeroPress is pushing back. In that case, you’re probably using a grind that’s too coarse.
On the other hand, if pressing the plunger seems to be too easy to be true, then you’re using a grind that’s too fine.
Finally, if you like a very strong cup of java, consider using coffee ice cubes instead of regular ones. By this, I mean simply freezing your brew into an ice tray and then using those cubes in your drink.
Recipe Box

Iced Coffee with AeroPress
Equipment
- AeroPress
- Coffee Scale
- Grinder (optional)
Ingredients
- 0.6 ounces coffee
- 3 ounces ice
- 4.8 ounces water
Instructions
- Add 3 ounces of ice to the cup.
- Put the plunger in the chamber, then flip the AeroPress upside down
- Add 0.6 ounces of the coffee ground into the AeroPress.
- Boil 4.8 ounces of water using the kettle, then let it settle for 30-60 seconds.
- Pour water into the AeroPress just enough to saturate the grounds. Let it bloom for 30 seconds.
- Stir the coffee grounds for another 30 seconds.
- Wet the paper filter, then place it into the cap and attach it to the brew chamber.
- Flip the assembly over the cup and press the plunger, and pour coffee over the ice.
FAQ
Have other AeroPress-related questions? Let’s solve them now. Here’s a quick FAQ with short but sweet explanations that should resolve your doubts.
How do you make a cold brew with AeroPress?
Making AeroPress cold brew coffee is rather similar to making a regular cup of coffee, aside from two things. First, you’re using room-temperature water instead of hot. Second, you should stir the grounds for about a minute before pressing the plunger for better extraction.
Can you pour boiling water into AeroPress?
Technically, you can. But boiling water is too hot for any brewing method and will cause your coffee to taste burnt. Instead, let the water cool for 30-60 seconds after boiling it before pouring it into the AeroPress coffee maker.
How can I get more flavor out of my AeroPress?
The AeroPress doesn’t leave you much room to play around with different grind sizes or brewing time. But you can make a more flavorful cup of coffee by choosing fresh, high-quality coffee beans. Also, don’t forget the blooming part, which ensures your coffee gets properly extracted.
To Sum Things Up
Making iced coffee at home is rather quick and easy when you have the AeroPress at your disposal.
To get the best of your coffee grounds, don’t forget to let them bloom for half a minute before proceeding with the extraction. This ensures you get all the necessary compounds into your cup of java.
Want to make a cold brew coffee without 12+ hours of wait? Here’s our step-by-step guide on how to do that using AeroPress.